GitTutorials

Git Crash Course On Code Versioning

8 Mins read

Working and managing large development projects is a very serious proposition. An important challenge is code version management a number of developers create and update code for the project.

To maintain the history and various versions of the code, the best technical solution is Git. This tool allows you to build the history of the code by updating nodes with unique hashes.

Git offers a set of commands for maintaining code versions and deployment on the production servers. It works equally well with GitHub and bitbucket and it an ideal component of the workflows of development projects.

In this article, I will offer a detailed overview of creating local repositories and how a developer can add, commit, merge code and view the changelogs. I will also demonstrate a workflow between local machine->GitHub->Production server for automatic code deployment.

In particular, this article will discuss the following topics:


  • Git Architecture
  • Git Installation
  • Local Code Repositories
  • Git Staging Environment
  • Pushing code to GitHub
  • Clone & Pull the Repo from GitHub
  • Working with Branches
  • Automatic Deployment through GitHub


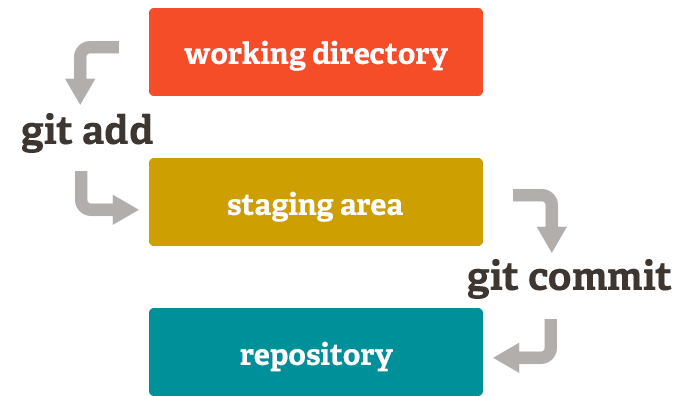
Git Working Architecture

Git works on a three-tree architecture:

1. Working Directory

This is the local directory where you create code and manage versions through commits. This will add to the version history of the code.

2. Staging Directory

Staging directory contains the committed code of the project. This branch keeps track of the changes made in the code. This state tracks the changes in various branches. The developer(s) are notified of any conflicts in the code. These conflicts are resolved before the code is pushed to the deployment directory.

3. Repository

Repository is the place for deploying the final code after the final merging of the code. Git creates a final copy on the local machine and repositories on both GitHub and Bitbucket. I personally prefer Github, as it is more developer-friendly.


Git Installation on Different OS

To start versioning code, you need to install Git globally on your operating system. The first step is to go to Git SCM website and download the appropriate setup for Windows, Linux and MacOS. Once you follow the installation wizard and complete the installation process, you can initialize Git in any project and create local repositories.

Working with Local Repository

Now that the installation is finished, the next step is to initialize it. Go to the project’s root folder and run the `git init` command in bash or terminal. This will initialize Git in the project and create an empty repository folder .git.


This folder will contain all the history of the code. Every node of code will be identified uniquely.

Adding Files to Staging


After initializing the bare Git repository, the next step is the addition of your entire set of files to Git staging directory. For this, run the `git add` command. Here you have a choice: you can add the entire set of files or an individual file to the Staging directory. To add all the files add (.) with the command (`git add .`). In the case of an individual file, just  pass the name of the file with the command (`git add index.php`). In this case, only the index file is added to the staging directory.


Status of Tracked Files

You can see the status of all tracked file in the staging directory. These files are ready to be finally committed. Run the `git status` command to see which files are tracked and already present in the staging directory.


Obviously, you can delete any unnecessary files and untracked them from the directory by running the following command `git rm –cached <file>`. I will demonstrate this command later on.

Committing the Changes

As all files are now added and tracked, they are ready to be committed in the local repository. A commit is a unique node which contains a message with a unique hash. You can use this hash to further manipulate the associated commit.


Commit all the files through the following command:


`git commit -m “my first commit”`


You can see the unique generated hash code (3f877ca) and the message my first commit.  Once the command finished all the files from staging directory will be moved to the repository. After committing the code, you can push it to GitHub and Bitbucket.

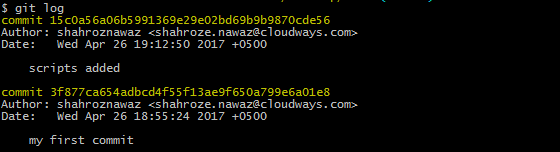
Logging and Checkout Commits

During an average project, a large number of comits are generated. You can get the list of all the commits by running the command: `git log`


If you want to see the short description of commits, you can run `git log –oneline`:


If you want to move to a previous commit and remove the latest one, you can checkout to that commit. Once you do this, the code history is updated to the checkout commit.


At this time, if you run `git log`, you will see only one commit history which you checkout.


Git Staging Directory: File Removal

In the staging directory, you can delete and retrieve deleted files. Assume that I have created a connect.php file in the project. I will add this file to the staging by using the command: ‘git add connect.php’.  


Now at some point, I might need to delete this file from the folder. Even when deleted, I can retrieve this file because it is still present in the Git history. If needed, retrieve the file by running the following command:


`git checkout <delete file name>` i.e `git checkout connect.php`


If you want to remove this file completely, run the following command:


`git rm <delete file name>` i.e `git rm connect.php`

Push Code to GitHub

Once you have committed all the updated changes of the code, the next step is to push the code version to GitHub. First, you need to create an account on GitHub.


After the signup, click the create new repository button and fill out the required information:


Once you click the Create Repository button, you will get the URL of the repo.


You need this URL to tell Git where you want to push your first code version.


Run the bash command: `git remote add origin https://github.com/shahroznawaz/testdemo.git`


This command will add the repo URL to Git. Next, I will push the code to this repo. Run the following command in bash: `git push -f origin master`:


Next, go to GitHub and you can see the the files in the repo:


Clone & Pull the Repo From GitHub

You have just open sourced the first version of your application on GitHub. Other people could now visit the app and contribute to your app. But to contribute, they need to clone the application on their local system. Git provides the clone command to copy the whole project to you local machine.


Now, as multiple people start contributing to your code, everybody first need to pull the latest changes. This means that every time you push code to GitHub, you first need to pull the latest version of the code through the
`git pull origin master` command. The new updated code will merge with the local copy.

Working with Branches in Git

Branches are separate working environments complete with working directories and staging environment. Every branch has its separate record of commits that could be merged with the master branch upon the successful completion of the project. Git provides a master branch by default. You can create and checkout to a new branch with this command:


`git checkout -b newbranch`


To list all the branches, use the command: `git branch`


To delete a branch, run the below command:
`git branch -d <branch name>`


Similarly, to rename a branch, use this command:
`git branch -m <old name> <new name>`

Comparing Branches

Branches are usually created to test specific features. Successful branches are then merged with the master branch. You can also see the differences of commits and code changes by passing the two branches’ name in following command”


`git diff <branch name>..<branch name>`. Remember that Git uses the (..) operator to show differences.


Merge Two Branches

At this point, you have two branches in the project, master and newbranch. You can easily merge the two branches by first switching to master and then merging it with the other branch. The command to merge the branches is `git merge <branch name>`


After merging the branch with the master, run `git log` to see the changes and new commits.


Resolve Merge Conflicts

While merging branches, you would face conflicts in code versions. Git provides three ways for resolving conflicts:


  • Aborting the merge
  • Resolving conflicts manually
  • Using Tools
You can simply abort the merge process through this command: `git merge –abort` The second step is to resolve the conflicts manually in the code. You need to go through the files and correct the issues the code. Git provides marks that identify the line of codes which have caused conflicts.
You need to correct the code and Git will remove the markings. Finally, commit your code and merge again. You can also use GUI clients for resolving these conflicts and managing Git operation.

Automatic Deployment with GitHub

Now comes the favourite part for any developer. You can create simple or complex workflows in Git for automatic code deployment of code. Suppose you have a live server and you want to push code from local machine to deployment server directly. The  workflow will be: local machine >> Github >>Live server . You create new code, push it to Github and Github will deploy the code on live server automatically.


For this purpose, I have setup a DigitalOcean server on Cloudways. You can signup for an account so that you could create a server and application. Now launch the SSH terminal and sign in using Master Credentials.


Go to your project folder by running the command: ‘cd application/public_html/{your_app}’ and clone the whole application from GitHub:


Change your database credential if needed (you can find your DB credentials and application URL in the Application Access Area). Try out your app in browser.


Create a Webhook in GitHub

After cloning the application, you need to create a webhook in Github. A webhook is the file which contains Git Pull command. Upload this file to your project folder on live server. Every time you push code to a Github repo, this file will trigger the Pull command and fetch the latest code to your Cloudways or any other hosting server. Create a file named github.php and add the following simple line of code in it:


<?php `git pull`?>


Now upload the file to the server and copy the full path of the file. You need to put this URL in Github webhook settings:


Copy the URL in Payload URL box and select what event you want to trigger. I set it up to “Just push event”, check the Active selection and finally click the “Add Webhook” button. Now when you Commit and Push any new code from your local machine, Github automatically pulls the code at the deployment server at Cloudways. Also, Github shows the recent delivery of code:


Tools for Automatic Deployment

Beside creating your own workflows, you can also use open source or paid tools for automatic deployment to your production server. DeployBot and deployHQ are two popular tools for continuous integrations.

Final Words

Working and contributing to open source technologies is the latest trend these days. A developer is judged by the code contributed to the open source projects. While contributing, you always need to create versions of your code, handling multiple pull requests, merging and resolving conflicts in branches. All this can only happen with Git. Use the above commands to set up workflows and practically implement code versioning. If you have any question or queries, please comment below.

Shahroze is a PHP Community Manager at Cloudways – A Managed PHP Hosting Platform. He’s always in search of new frameworks and methods to implement them. Besides his coding life, he loves movies and playing soccer with friends. You can email him at shahroze.nawaz@cloudways.com

Leave a Reply

Your email address will not be published. Required fields are marked *