

Chatter is an enterprise social network and collaboration environment. Force.com exposes various useful information from Chatter such as users, organizations, groups, feed-items through APIs. Using this information, we can build a proof-of-concept dashboard which will show a user’s or organization’s feed in real-time. Real-time dashboard can provide an accurate understanding of what is happening in an organization.
This tutorial expects that you are an intermediate-level web application developer and have a few weeks of experience with Rails and related ecology. This means you should be familiar with building blocks of a Rails app and terms like OAuth, REST, Callback, bundler, gem etc.
Here is an outline of how things will work:
- User can login to our Rails4 powered dashboard (a connected app) using ‘Sign in with Salesforce’ (Oauth 2). We use OAuth to get a secret token for each user from salesforce.com. We can use the token to call APIs.
- Our goal is to receive a callback to server whenever anything is posted on Chatter. Unfortunately, Force.com doesn’t support a PushTopic for FeedItem, so we will use a work-around to trigger a callback whenever a FeedItem is created. First, we will create a trigger on FeedItem, this trigger will create a custom object named ProxyFeedItem, which will copy necessary fields like body, time, parent_id etc. from the FeedItem.
- Using a faye client embedded in restforce client, we will listen to a PushTopic for ProxyFeedItem.
- ProxyFeedItem will be created whenever there’s an update to any FeedItem. This will send a callback to the server with data of the ProxyFeedItem.
- We will need to forward this incoming data to user’s browser. We will set up another faye channel and just transfer the data we received in step 4.
First, go to https://developer.salesforce.com/signup and register for your free Developer Edition (DE) account. For the purposes of this example, I recommend sign up for a Developer Edition even if you already have an account. This ensures you get a clean environment with the latest features enabled. After sign up, make a connected app by following the directions found in this article from the salesforce.com developer portal. Use http://localhost:3000 as Start URL, enable Oauth settings, select appropriate permissions and use http://localhost:3000/oauth/salesforce/callback as callback URL. When you create your app, you will get the app’s Consumer Key and Consumer Secret.
We have set up everything that we need from Force.com for this section and we can move on to our web application code. Create a new Rails4 application with
rails new chatter-dashboard
This will go ahead and create a Rails4 project with the name ‘chatter-dashboard’ and install the dependencies mentioned in Gemfile. Actually, we need a few more dependencies. Change Gemfile to the following:
source ‘https://rubygems.org’
# Bundle edge Rails instead: gem ‘rails’, github: ‘rails/rails’
gem ‘rails’, ‘4.1.0’
# Use sqlite3 as the database for Active Record
gem ‘sqlite3’
# Use SCSS for stylesheets
gem ‘sass-rails’, ‘~> 4.0.3’
# Use Uglifier as compressor for JavaScript assets
gem ‘uglifier’, ‘>= 1.3.0’
# Use CoffeeScript for .js.coffee assets and views
gem ‘coffee-rails’, ‘~> 4.0.0’
# See https://github.com/sstephenson/execjs#readme for more supported runtimes
# gem ‘therubyracer’, platforms: :ruby# Use jquery as the JavaScript library
gem ‘jquery-rails’
# Turbolinks makes following links in your web application faster. Read more: https://github.com/rails/turbolinks
gem ‘turbolinks’
# Build JSON APIs with ease. Read more: https://github.com/rails/jbuilder
gem ‘jbuilder’, ‘~> 2.0’
# bundle exec rake doc:rails generates the API under doc/api.
gem ‘sdoc’, ‘~> 0.4.0’, group: :doc# Spring speeds up development by keeping your application running in the background. Read more: https://github.com/rails/spring
gem ‘spring’, group: :development# Use ActiveModel has_secure_password
# gem ‘bcrypt’, ‘~> 3.1.7’# Use unicorn as the app server
# gem ‘unicorn’# Use Capistrano for deployment
# gem ‘capistrano-rails’, group: :development# Use debugger
# gem ‘debugger’, group: [:development, :test]
# Using customized version to fix issue #103 in restforce
gem ‘restforce’, :git => ‘git@github.com:malavbhavsar/restforce.git’, :branch => ‘patch-1’
# Use omniauth for handlling OAuth with Salesforce
gem ‘omniauth’
# Add omniauth policy for saleforce
gem ‘omniauth-salesforce’
# Print pretty
gem ‘awesome_print’
# Development only gems
group :development do
gem ‘better_errors’
gem ‘binding_of_caller’
end
# Add faye for pub/sub, using customized version to avoid problems from
# issue 263 and other related issue
gem ‘faye’, :git => ‘git@github.com:faye/faye.git’
# private_pub to easily do pub-sub with browser, using customized version
# to make sure that we get faye.js which is not packed when using faye gem
# from master
gem ‘private_pub’, :git => ‘git@github.com:malavbhavsar/private_pub.git’
# Puma for our main server concurrently
gem ‘puma’
# Thin for running faye server
gem ‘thin’
Run bundle install, which will install additional dependencies. To start our server, run rails s puma; this will run rails with a puma server and you should be able to see a welcome page on http://localhost:3000.
The next step is to set up Oauth with salesforce.com. Add Consumer Key and Consumer Secret to chatter-dashboard/config/secrets.yml
development:
secret_key_base:
salesforce_key:
salesforce_secret:test:
secret_key_base:# Do not keep production secrets in the repository,
# instead read values from the environment.
production:
secret_key_base: <%= ENV[“SECRET_KEY_BASE”] %>
Create a chatter-dashboard/config/initializers/omniauth.rb file and add the following code into it:
Rails.application.config.middleware.use OmniAuth::Builder do
provider :salesforce, Rails.application.secrets.salesforce_key, Rails.application.secrets.salesforce_secret , {:scope => “id api refresh_token”}
end
This configures our omniauth and omniauth-salesforce gems. It has basically added a middleware in our Rails application, which will handle Oauth for us. You can read the documentation for these gems to dig deeper.
Now, run the following commands to set up two controllers and relevant routes; one for the login page and the other for the feed page:
rails g controller Login login
rails g controller Feed feed
Now, in the chatter-dashboard/config/routes.rb file, add the following routes:
get ‘/auth/:provider/callback’, to: ‘sessions#create’
root to: ‘login#login’
This will basically add a callback route to which the user will be redirected to by Force.com after the Oauth procedure has finished successfully. We have also added a root route, so that whenever we go to http://localhost:3000, it will trigger the login#login route. Currently, it’s just an empty page. Let’s add a ‘Sign in with Salesforce’ link to it. Add the following line to chatter-dashboard/app/views/login/login.html.erb:
<%= link_to “Login with Salesforce”, “/auth/salesforce” %>
If you hit refresh and click on ‘Sign in with Salesforce’, you will be taken to the login page of salesforce.com if you are not signed in. After signing in and giving the app permissions, you will be redirected to http://localhost:3000/auth/salesforce/callback, but we haven’t implemented matching sessions#create yet. Let’s do that by doing rails g controller Sessions create. For the implementing create method, use the following code:
class SessionsController < ApplicationController def create set_client ap @client redirect_to ‘/feed/feed’ end protected def auth_hash_credentials request.env[‘omniauth.auth’][:credentials] end def set_client @client = Restforce.new :oauth_token => auth_hash_credentials[:token],
:refresh_token => auth_hash_credentials[:refresh_token],
:instance_url => auth_hash_credentials[:instance_url],
:client_id => Rails.application.secrets.salesforce_key,
:client_secret => Rails.application.secrets.salesforce_secret
end
end
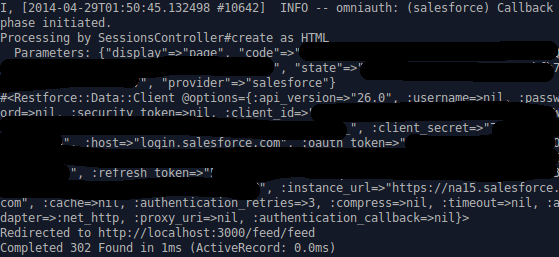
Here, we parse the callback request coming from Force.com and get oauth_token, refresh_token etc and create a restforce client. If you see something like the following in your console, then you have completed the first section of this tutorial:

In the first section of the tutorial, we set up Oauth with salesforce.com and created a restforce client object. In this section, we want Force.com to notify us of any changes in the FeedItem object of Chatter. Unfortunately, Salesforce streaming API doesn’t support FeedItem yet, so we will have to do a work-around.
Create a custom object named ProxyFeedItem. Add necessary fields like Body, Type, CommentCount, LikeCount, CreatedById from FeedItem


Now, let’s setup a trigger on FeedItem. You can do this by going to ‘Setup’ on your Force.com and search for ‘FeedItem Trigger’. Use the following code:
trigger FeedItemListen on FeedItem (after insert, after update) {
for(FeedItem f : Trigger.new)
{
ProxyFeedItem__c p = new ProxyFeedItem__c(Body__c = f.Body,
CommentCount__c = f.CommentCount,
LikeCount__c = f.LikeCount,
Type__c = f.Type,
User__c = f.CreatedById);
insert p;
}
}
Whenever this is triggered, we get the data from Trigger.new iterate over it and create our custom object ProxyFeedItem for each FeedItem in the data.
Now, we have to create a PushTopic, which will listen to any changes in all ProxyFeedItem (and in turn FeedItem) We will subscribe to this PushTopic and send the changes to browser.
Following the streaming example given in the restforce docs, we can create a file at chatter-dashboard/lib/chatter_listen.rb like the following:
module ChatterListenEM
def self.start(client)
pushtopics = client.query(‘select Name from PushTopic’).map(&:Name)
unless pushtopics.include?(‘AllProxyFeedItem’)
client.create! ‘PushTopic’, {
ApiVersion: ‘30.0’,
Name: ‘AllProxyFeedItem’,
Description: ‘All ProxyFeedItem’,
NotifyForOperations: ‘All’,
NotifyForFields: ‘All’,
Query: “SELECT Id, Body__c, CommentCount__c, LikeCount__c, Type__c, User__c from ProxyFeedItem__c”
}
end
Thread.abort_on_exception = true
Thread.new {
EM.run do
client.subscribe ‘AllProxyFeedItem’ do |message|
print “====================================”
print “Recieved message”
ap message
PrivatePub.publish_to “/messages/new”, :chat_message => message
end
end
}
die_gracefully_on_signal
enddef self.die_gracefully_on_signal
Signal.trap(“INT”) { EM.stop }
Signal.trap(“TERM”) { EM.stop }
end
end
Whenever ChatterListenEM.start is called, it creates a PushTopic named ChatterFeedItem, if it doesn’t already exist. Next, it creates a new thread and subscribes to that PushTopic in it. Whenever we receive a message, we pass it a Faye channel e.g. messages/new using private_pub. private_pub is a ruby gem, which makes it easier to setup a pub-sub type mechanism between a web server and browser. You can learn more about it in this screencast on private pub
Before going to private_pub and related stuff, let’s call our ChatterListenEM.start method from SessionController. There is just one minor change:
require ‘chatter_listen’
class SessionsController < ApplicationController def create set_client ChatterListenEM.start(@client) redirect_to ‘/feed/feed’ end protected def auth_hash_credentials request.env[‘omniauth.auth’][:credentials] end def set_client @client = Restforce.new :oauth_token => auth_hash_credentials[:token],
:refresh_token => auth_hash_credentials[:refresh_token],
:instance_url => auth_hash_credentials[:instance_url],
:client_id => Rails.application.secrets.salesforce_key,
:client_secret => Rails.application.secrets.salesforce_secret
end
end
Now, let’s set up private_pub. Run rails g private_pub:install on console. It will create and place necessary files like private_pub.ru, private_pub.yml and faye.js, private_pub.js in asset-pipeline. To make rails aware of faye.js and private_pub.js files, add them to the chatter-dashboard/app/assets/javascripts/application.js file.
// This is a manifest file that’ll be compiled into application.js, which will include all the files
// listed below.
//
// Any JavaScript/Coffee file within this directory, lib/assets/javascripts, vendor/assets/javascripts,
// or vendor/assets/javascripts of plugins, if any, can be referenced here using a relative path.
//
// It’s not advisable to add code directly here, but if you do, it’ll appear at the bottom of the
// compiled file.
//
// Read Sprockets README (https://github.com/sstephenson/sprockets#sprockets-directives) for details
// about supported directives.
//
//= require jquery
//= require jquery_ujs
//= require faye
//= require private_pub
//= require turbolinks
//= require_tree .
Start our Faye server in a different console. This will handle pub-sub for us.
rackup private_pub.ru -s thin -E production
All that is left to do now is to subscribe to the channel /messages/new and print our data. We can take easy examples from the private_pub documentation and add the following to our chatter-dashboard/app/views/feed/feed.html.erb:
<%= subscribe_to “/messages/new” %>
and the following to our chatter-dashboard/assets/javascripts/feed.js:
PrivatePub.subscribe(“/messages/new”, function(data, channel) {
console.log(data.chat_message);
});
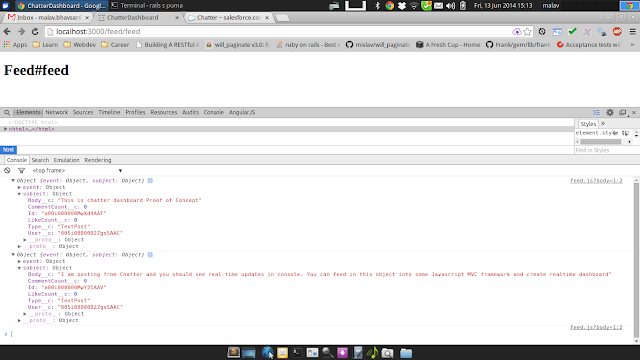
Now, go to http://localhost:3000, ‘Login with Salesforce’ and you will end up on the feed page. Open the developer console and in another tab open the Chatter tab of salesforce.com. If you do a text post, you will be able to see a real time update in the console.

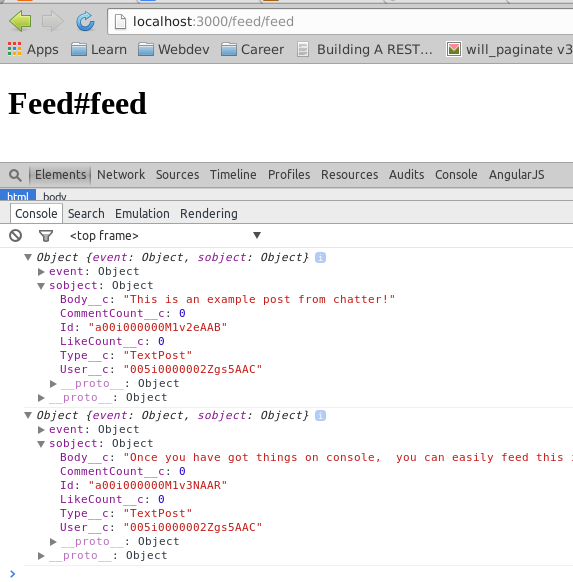
Here’s a proof of concept, showing the dashboard in action:

We just implemented a system like below:


Instead of printing data in console, you can easily feed it into any frontend framework like angular, ember etc. and create a great real-time dashboard.
We also have left out few things in this proof-of-concept prototype e.g. we have to secure our faye channels. One way of doing this is creating a different channel for each user. e.g. /messages/new/user_id and subscribe the user only to that particular channel. Additionally, use SSL. If you are handling any real user data, it is important that you secure the data being transferred. Force.com makes sure to secure the data and only provides developers with data over SSL using OAuth. It is however the responsibility of the developer to ensure secure communication in any RESTful app. For more information, you should refer to Security Resources.
You can find the code for this project at github chatter-dashboard
Resources
For a comprehensive set or resources, check out: https://developer.salesforce.com/en/mobile/resources